

Are you tired of feeling self-conscious about unwanted hair and dull skin? Performing a waxing treatment at home using a waxing starter kit can be a valuable addition to your self-care routine, boosting confidence and leaving you with smooth, radiant skin. When combined with a soothing Aftershave, you can achieve professional-grade results in the comfort of your own home, making it an essential part of your beauty regimen for both skin health and hair removal.

Materials & Supplies
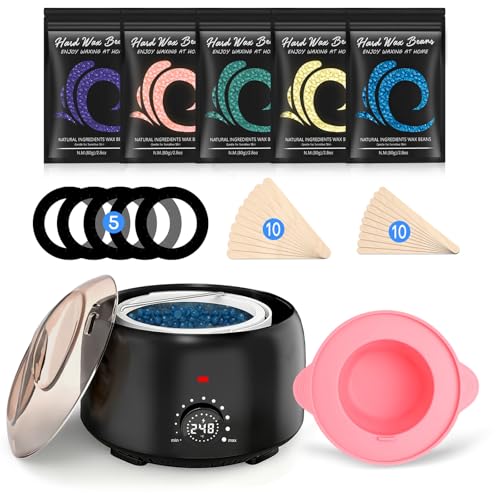
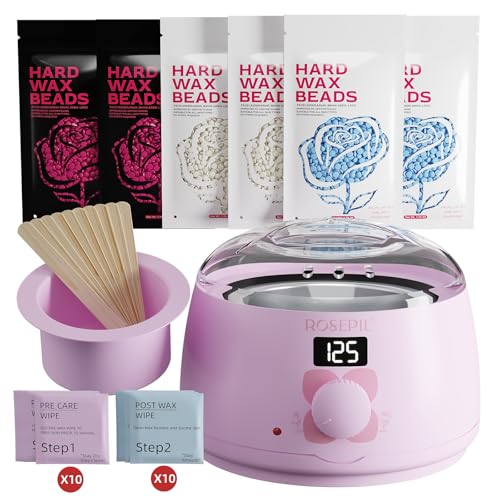
To get started with your at-home waxing treatment, you’ll need a few essential materials and supplies. These include:
– A waxing starter kit, which usually comes with wax, applicator sticks, and strips for removal.
– A cleanser to prepare your skin before waxing.
– A pre-waxing oil or powder to ensure the wax adheres properly to the hair and not the skin.
– Post-waxing lotion or Aftershave to soothe and moisturize the skin.
– A timer to ensure you don’t leave the wax on for too long.
– Gloves for hygiene and to prevent wax from sticking to your hands.
– A mirror to see what you’re doing, especially in hard-to-reach areas.
Each of these items plays a crucial role in achieving a safe and effective waxing experience at home. The waxing starter kit is the core of the process, providing everything you need to remove unwanted hair. The Aftershave helps in calming the skin post-waxing, reducing redness and irritation.
Preparation & Timing
Preparation is key when it comes to waxing. The process involves several steps, including preparing your skin, applying the wax, removing the hair, and aftercare.
This can take anywhere from 20 to 60 minutes, depending on the area you’re waxing and your level of experience. It’s essential to plan your routine to ensure the best results and to fit it into your schedule.
Step-by-Step Instructions
To achieve professional-grade results with your waxing starter kit, follow these steps:
1. Prepare your skin by cleaning and drying it thoroughly.
2. Apply a thin layer of pre-waxing oil or powder to the area.
3. Heat the wax according to the instructions provided with your waxing starter kit.
4. Apply the wax in the direction of hair growth.
5. Place a strip over the wax and press down firmly.
6. Remove the strip quickly in the opposite direction of hair growth.
7. Apply Aftershave or a soothing lotion to calm the skin.
Remember, the key to successful waxing is to do it in the right direction and to use the right products, including a high-quality waxing starter kit and a gentle Aftershave.
Beauty Benefits / Advantages
The benefits of waxing extend beyond just removing unwanted hair. It can also improve skin texture, leaving it feeling smooth and looking radiant. Regular waxing can reduce hair regrowth, making it a long-term solution for hair removal. Additionally, exfoliating before waxing can help remove dead skin cells, further enhancing skin texture and appearance. For maximum benefits, consider combining waxing with other skincare routines and using products like waxing starter kit and Aftershave to achieve a comprehensive beauty regimen.
Personal Care Advice
To maintain the results of your waxing treatment, it’s essential to adapt your skincare routine. This includes moisturizing regularly to keep the skin hydrated and healthy, avoiding tight clothing that can cause friction, and exfoliating gently to prevent ingrown hairs. Consider your skin type and the area you’ve waxed when choosing products, and always do a patch test before using a new waxing starter kit or Aftershave to ensure you don’t have any adverse reactions.
Common Mistakes to Avoid
One of the most common mistakes people make when waxing at home is not preparing their skin properly. This can lead to poor wax adhesion, causing the wax to be less effective and potentially leading to ingrown hairs or other skin irritations.
Another mistake is waxing over the same spot multiple times, which can cause redness, irritation, and even bleeding. Always follow the instructions provided with your waxing starter kit and apply Aftershave to soothe the skin afterward.
Product Care & Maintenance Tips
To ensure your waxing starter kit and other beauty products last long and remain effective, proper care is essential. This includes cleaning your applicator sticks and strips thoroughly after use, storing your wax in a cool, dry place, and checking the expiration dates of your products. For your Aftershave, keep it away from direct sunlight and heat sources to preserve its potency.
Conclusion
Incorporating a waxing starter kit into your beauty routine can be a game-changer for smooth, radiant skin. When paired with a gentle Aftershave, you can achieve professional-grade results in the comfort of your own home. Remember to follow the instructions carefully, prepare your skin properly, and take good care of your products to ensure the best results and longevity of your waxing starter kit and Aftershave. Share your waxing experiences and tips in the comments below, and don’t forget to explore more beauty posts for a comprehensive approach to skincare and hair removal.
FAQs
1. Q: How often should I wax for the best results?
A: The frequency of waxing depends on your hair growth. On average, waxing is needed every 3 to 6 weeks.
2. Q: Can I wax sensitive areas?
A: Yes, but be cautious and consider doing a patch test first. Sensitive areas may require special care and products.
3. Q: How do I prevent ingrown hairs after waxing?
A: Exfoliate gently before waxing, avoid tight clothing, and moisturize regularly to help prevent ingrown hairs.
4. Q: Can I use any waxing starter kit for all body parts?
A: No, different areas of the body may require specific types of wax. Always choose a waxing starter kit suitable for the area you’re waxing.
5. Q: Is Aftershave necessary after waxing?
A: While not necessary, Aftershave or a soothing lotion can help calm the skin, reduce redness, and prevent ingrown hairs, making it a recommended part of your post-waxing care.