

Unlock Salon-Worthy Professional Nail Art Kit at Home: Your Ultimate Guide
Have you ever stared in awe at an intricate, salon-fresh Professional Nail Art Kit, wondering how to achieve that level of detail and creativity without the recurring appointment and expense?
The secret isn’t always a mysterious talent—it’s often the right arsenal. Mastering stunning nail designs from your living room is not only a creative outlet but a profound act of self-care.
It’s about carving out moments for yourself, boosting your confidence with every glance at your hands, and expressing your unique style. This journey begins with equipping yourself properly. Investing in a high-quality professional nail art kit is the foundational step that transforms your beauty routine from mundane to magnificent. It bridges the gap between amateur attempts and pro-level precision, making complex-looking designs suddenly achievable. Coupled with the right professional nail art tools, you move beyond basic polish application into the realm of true artistry, where lines are crisp, gradients are seamless, and embellishments sit perfectly. This guide will demystify the process, turning your home into a personal nail studio and your fingertips into canvases for wearable art.
Materials & Supplies: Building Your Pro-Degree Arsenal
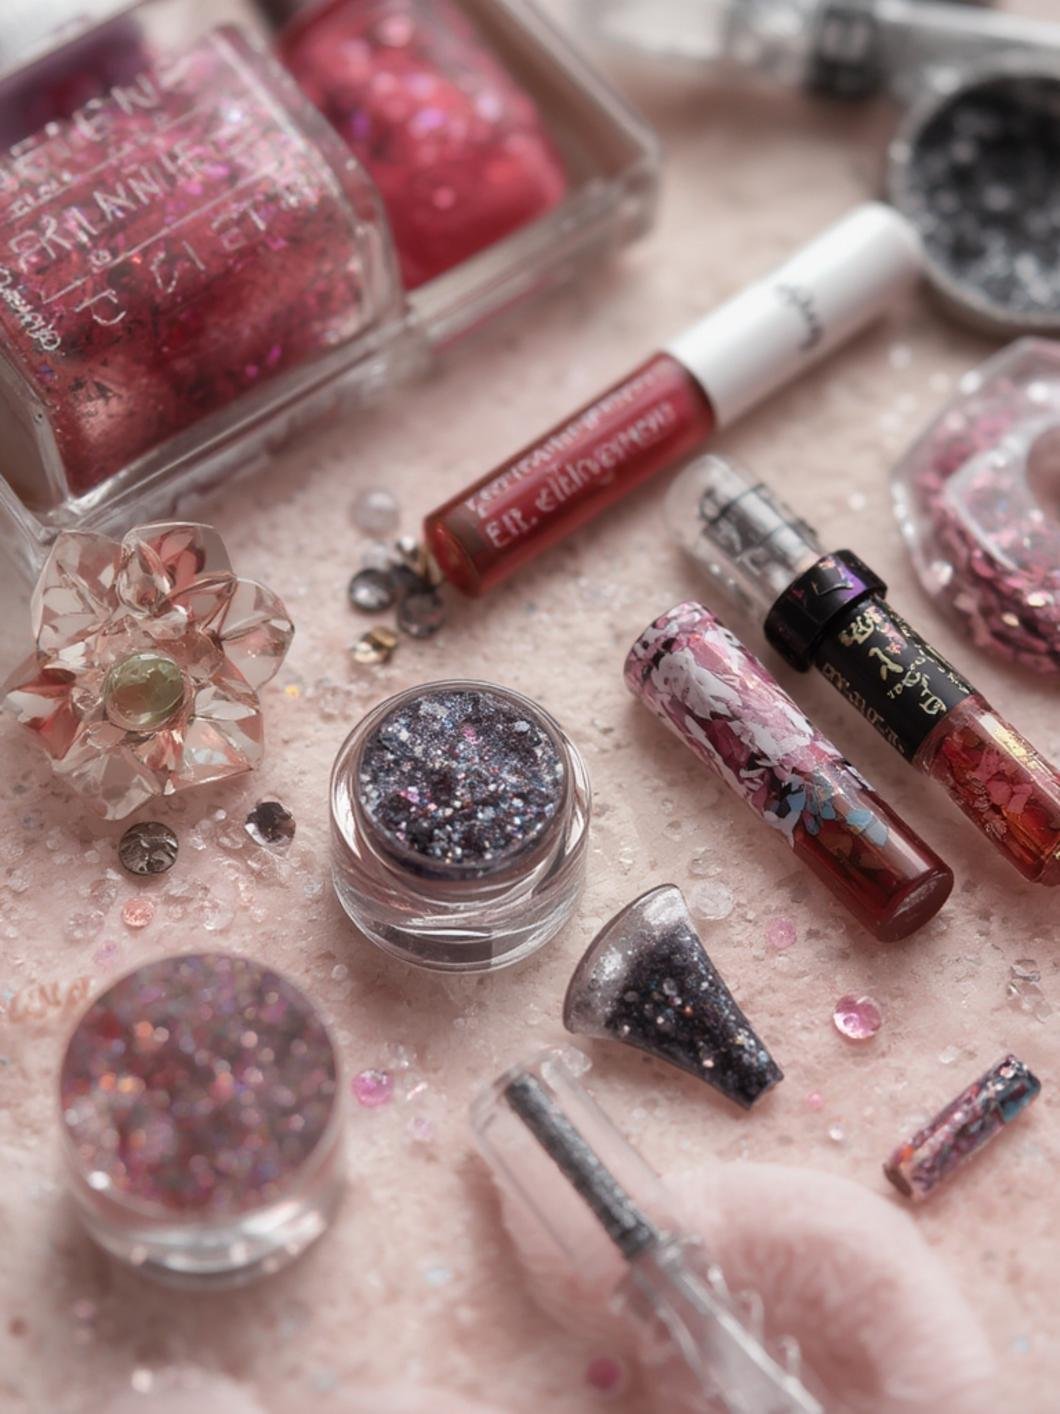
To execute a Professional Nail Art Kit, a scattered collection of polishes isn’t enough. You need a curated toolkit where each item has a specific, indispensable purpose. Think of this as your artist’s palette and brushes.
- Base & Top Coats: A high-adhesion base coat is non-negotiable for protecting your natural nail and preventing stains. A glossy, durable top coat seals your artwork, providing chip resistance and a salon-like shine. Consider a quick-drying top coat for efficiency.
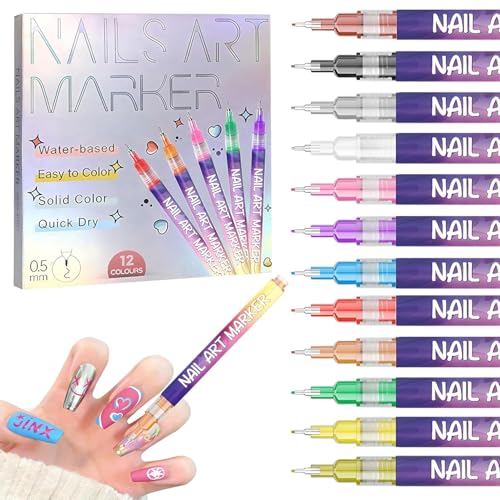
- Nail Polishes: A versatile color range is essential. Start with core shades: black, white, red, nude, and a metallic collection. For advanced designs, add gel polish formulations if you have a UV/LED lamp.
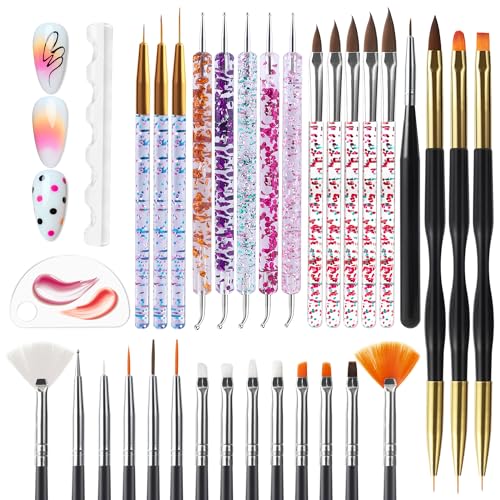
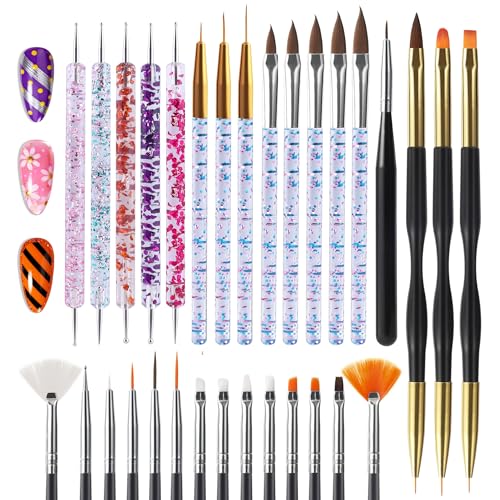
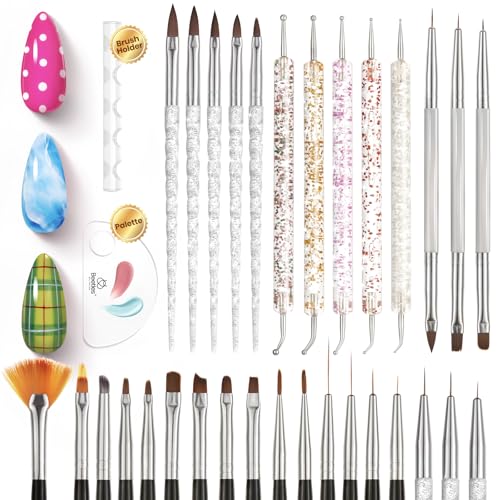
- Professional Nail Art Tools: This is the heart of your kit. You’ll need:
– Fine-L Detail Brushes (00, 0): For etching tiny lines, dots, and intricate patterns.
– Striping Brushes: Long, thin brushes for creating steady lines and stripes.
– Dotting Tools (various sizes): Perfect for polka dots, flowers, and abstract shapes.
– Ombré/Gradient Sponges: For achieving seamless color fades.
– Cuticle Pusher & Nippers: For precise cuticle management, creating a clean canvas.- Cleaning & Prep Supplies: Lint-free wipes, pure acetone or nail polish remover for cleaning brush bristles and correcting mistakes, a nail buffer, and a dehydrator/cleanser for prepping the nail surface.
- Decorative Embellishments: Rhinestones, glitters, flakes, striping tape, stamping plates & scraper, and nail stickers for adding dimension and flair.
- Safety & Hygiene: A headband to keep hair back, gloves for certain chemical processes, and a well-ventilated workspace. A dedicated brush cleaner solution extends tool life.
Each tool in a dedicated professional nail art kit is designed for a specific function, eliminating frustration and ensuring precision. From the tapered tip of a detail brush to the perfect spring of a cuticle nipper, quality tools make the difference between a struggle and a flow.
Preparation & Timing: Laying the Groundwork for Flawlessness
Rushing into the application is the fastest route to a botched manicure. Proper preparation accounts for 50% of your success. Allocate 20-40 minutes total for a full treatment.
Step 1: Prep (5-10 minutes). Begin with clean, dry, and oil-free nails. Push back cuticles gently and lightly buff the nail surface to remove shine. This creates a micro-roughness for optimal polish adhesion. Wipe each nail with a lint-free pad soaked in nail cleanser or acetone. This removes all traces of dust and oils. Apply your base coat and let it cure/dry completely as per the product instructions.
Step 2: Application & Design (15-35 minutes). This is where your professional nail art tools shine. Apply your base color(s) in thin, even layers, allowing each to dry. Now, execute your design. For complex art, work from the largest areas to the finest details. Use polishes with the perfect viscosity—not too thick to blob, not too thin to run. If using gel, cure each layer under your UV/LED lamp.
Step 3: Finishing (5-10 minutes). Once your design is complete and fully dry/cured, apply your top coat carefully, ensuring it caps the free edge of the nail to prevent chipping. Allow it to cure or dry thoroughly. Clean any stickiness with a lint-free wipe and cleanser if using gel. Apply cuticle oil for hydration and a finished look.
Mastering the Modern French Tip with a Graphic Twist
Let’s move from theory to practice with a trendy, modern take on the classic French manicure: the Graphic French. This look uses negative space and sharp lines, perfect for showcasing your new skills and Professional Nail Art Kit
- Foundation: After prep, paint all nails with two thin coats of a sheer pink or nude gel/regular polish. Cure or let dry completely.
- Plan Your Line: Using a fine detail brush dipped in black polish (or gel), practice the curve on a practice wheel or your thumb. The modern French tip has a more graphic, straighter smile line or a sharp diagonal. Decide on your style.
- Create the Guide: With the very tip of your striping brush or a thin piece of striping tape, meticulously draw the guide line. For a sharp diagonal, place tape from the outer cuticle corner to the center tip. Press down firmly to prevent bleeding.
- Fill & Clean: Using your regular brush, fill in the tip area above the guideline with your black polish. For the classic curved smile line, you may need to clean up the edge with a detail brush dipped in acetone after it’s dry.
- Remove Tape (if used): Gently peel away the tape while the polish is still slightly tacky for the crispest line.
- The Magic Detail: Now, for the graphic twist! Using a 000 detail brush dipped in a metallic gold or silver, paint a thin, straight line just below the black tip edge, parallel to the smile line. This adds an instant high-fashion detail.
- Seal the Deal: Apply your top coat meticulously, ensuring you don’t smudge the fine metallic line. Cure.
- Final Touch: Wipe with cleanser, massage in cuticle oil, and admire your salon-quality result.
Pro Tip: The stability of your hand is key. Rest your painting hand’s pinky finger on your cheek or a table for steadiness. A true professional nail art kit equips you with tools that hold polish well and offer supreme control, making these fine lines possible.
Professional Nail Art Kit : More Than Just Pretty Tips
Engaging in a Professional Nail Art Kit at home transcends vanity; it’s a multi-faceted wellness ritual.
- Precision Dexterity: The fine motor skills required for nail art keep your hand muscles agile and can be a form of mindful meditation, reducing stress as you focus on each tiny stroke.
- Creative Expression & Confidence: Your nails become a moving piece of art. Designing and wearing unique patterns is a powerful form of self-expression that boosts mood and personal confidence.
- Cost Efficiency & Education: While the initial investment in a comprehensive professional nail art tools set is higher, it pays for itself after a few salon visits. You also learn lifelong skills and product knowledge.
- Hygiene & Control: You control the sanitation of your Professional Nail Art Kit, eliminating risks from improperly cleaned salon equipment. You also control ingredient exposure, avoiding harsh chemicals found in some salon gels by selecting your own polishes.
Personal Care Advice: Adapting Your Nail Ritual
Your Professional Nail Art Kit routine isn’t one-size-fits-all. Tailor it for optimal results.
- Seasonal Adjustments: In winter, increase cuticle oil use to combat dryness. In humid summer, ensure each layer is fully dry before the next to prevent bubbling. Store temperature-sensitive glitters and gels in a cool, dark place.
- Skin Type Considerations: For sensitive skin, patch-test new polishes and base/top coats on a small area of skin (like behind the ear) 24 hours before use. Opt for “5-free” or “7-free” formulas that are free of common irritants like toluene and formaldehyde.
- Morning vs. Evening: An evening session is ideal as it allows maximum drying time overnight. If doing a quick fix in the morning, use fast-drying drops and avoid thick layers.
- Maintenance Between Treatments: To extend your design’s life, wear gloves for chores, avoid using the Professional Nail Art Kit, and reapply a thin layer of top coat every 2-3 days. Keep your tools clean; wipe brushes with acetone after every use and deep clean them weekly.
Common Mistakes to Avoid: The Pitfalls of the Pro-Am

Avoid these frequent errors to ensure flawless results every time.
- Mistake 1: Skipping the Base Coat. This leads to staining, peeling, and poor adhesion. Fix: Never skip it. Use a dedicated base coat and let it dry.
- Mistake 2: Using Thick, Bloopy Polish. Applying polish that’s too thick causes bubbling, long dry times, and uneven texture. Fix: If the polish is thick, add a drop of nail polish thinner (not remover!). Apply in thin, sweeping layers.
- Mistake 3: Rushing Dry Times. Smudging your masterpiece is devastating. Fix: Work on one nail at a time, allowing each layer 60-90 seconds to set before adding the next. Use a quick-dry spray or drops.
- Mistake 4: Neglecting Tool Hygiene. Using dirty brushes mixes colors and introduces bacteria. Fix: Clean brushes immediately after use with a brush cleaner or acetone. Store them upright to dry.
- Mistake 5: Forgetting the Free Edge. Not capping the tip with top coat is the #1 cause of tip-first chipping. Fix: Always run your top coat brush horizontally across the very edge of your nail.
Product Care & Maintenance Tips: Professional Nail Art Kit Your Investment
Your Professional Nail Art Kit is an investment in your beauty routine. Proper care is non-negotiable.
- Brush Care: After each session, wipe brushes on a paper towel with a little acetone to remove surface polish. Once a week, soak brush bristles (not the ferrule, where the metal meets the brush) in a dedicated brush cleaner for 10 minutes. Gently work the cleaner into the bristles with your fingers, rinse with acetone, reshape, and lay flat to dry.
- Product Storage: Store polishes in a cool, dark cupboard away from direct sunlight and heat sources, which thicken them and alter colors. Ensure caps are tightly sealed to prevent solvent evaporation and drying out.
- Tool Organization: Keep your professional nail art tools in a dedicated case or roll to protect delicate brush tips from damage and keep everything sterile and accessible.
- Expiration Awareness: Professional Nail Art Kit polish typically lasts 12-24 months after opening. If it becomes stringy,分离, or smells odd, discard it. Gel polishes have a similar shelf life. Using expired products can lead to poor application and infections.
Conclusion: Embrace Your Inner Nail Artist
Transforming your nails at home is a skill that blends creativity with technique. By starting with a solid professional nail art kit and understanding how to wield the specialized professional nail art tools within it, you unlock unparalleled potential. Remember the core principles: impeccable prep, patience with drying, and practice. What begins as a careful replication of a tutorial can evolve into your own signature style. The confidence that comes from knowing you can create stunning, personalized nail art on your own terms is invaluable. It’s self-sufficient beauty, a creative escape, and a statement of personal style all in one. So, dive in, experiment fearlessly, and wear your art with pride.
FAQs: Your Burning Professional Nail Art Kit Questions Answered
Q1: How often can I safely do nail art at home?
A: Listen to your Professional Nail Art Kit. With regular polish, you can change designs weekly. With gel, limit full removals to every 2-3 weeks to avoid over-filling and dehydration. Always give your nails a “breather” week with just a strengthening base coat between sets.
Q2: My nail art smudges even after waiting—am I doing something wrong?
A: Likely, yes. Ensure each layer is completely dry to the touch before applying the next. Use a quick-dry top coat. Humidity is the enemy—if it’s very humid, your dry times will increase significantly. A fan or air conditioning can help.
Q3: Are professional nail art kit tools really necessary, or can I use cheap alternatives?
A: For basic designs, you can improvise with toothpicks and thin makeup brushes. However, true precision, especially for fine lines and dots, requires tools engineered for the task. Good brushes hold polish evenly, have springy yet controllable tips, and won’t shed bristles into your design. They are a worthwhile investment for serious results.
Q4: How do I fix a smudge or mistake in my top coat?
A: If caught within a minute or two, you can gently glide a clean-up brush dipped in acetone over the smudge to soften it and feather it out. If it’s fully cured, you’ll need to file the top layer gently and re-apply top coat to that section.
Q5: Can I use professional nail art kit tools for other purposes, like makeup?
A: It’s not recommended. Professional Nail Art Kit polish and acetone are harsh and not formulated for the delicate eye area or skin. Using cross-contaminated tools around the eyes can cause serious irritation or infection. Keep your professional nail art kit tools strictly in the manicure zone.
Professional Nail Art Kit