

To achieve salon-perfect nails without leaving your living room, assembling the right tools is non-negotiable. A professional-grade manicure tool kit is the cornerstone of this process. At a minimum, you will need:


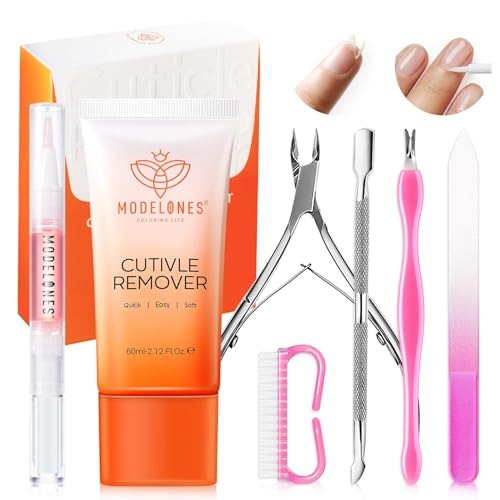
- Nail Clippers & Nail Files: For shaping and length control. A fine-grit file prevents splitting.
- Cuticle Pusher & Nipper: Gently pushes back and trims excess cuticles. Use with care to avoid damage.
- Buffer Block: Creates a smooth, glossy surface on the nail plate for better polish adhesion.
- Dust Brush: Clears away nail filings and debris.
- Orangewood Sticks: Perfect for cleaning under nails and precise cuticle work.
- Callus Remover/Pumice Stone: For essential hand and foot softness.
- Base & Top Coats: Non-negotiable for a long-lasting, chip-resistant manicure.
- Cuticle Oil or Cream: For post-manicure hydration and nail health.
- Sanitizer: Spray or wipe down all metal tools before and after use.
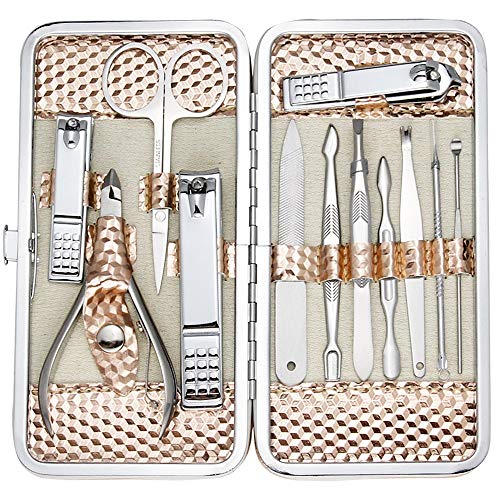
- A Quality manicure set: Often bundles these essentials into a convenient, organized case, ensuring you have everything in one place.
Investing in stainless steel tools will ensure durability, ease of sanitation, and a truly professional feel. Don’t forget a few cotton pads, rounds, and acetone or polish remover.
Preparation & Timing

Rushing is the enemy of a great manicure tool kit. Block out 45-60 minutes of uninterrupted time for the full experience. The process breaks down into three key phases:
- Skin & Nail Prep (10 minutes): Start with clean, dry hands. Soak nails in warm, soapy water for 5 minutes to soften cuticles. Dry thoroughly. Apply cuticle remover or oil and gently push back cuticles with a tool from your manicure tool kit.
- The Application Process (25-30 minutes): This is where the magic happens. File, shape, buff, and then apply your color in thin, even coats (base, 1-2 color coats, top). Allow proper drying time between layers.
- Post-Treatment Care (5 minutes): Once polish is dry to the touch, massage a rich hand cream or cuticle oil into the skin. This locks in moisture and adds a final touch of luxury.
Planning this routine, perhaps as a weekly Sunday ritual, ensures maximum absorption of products and transforms nail care from a chore into a cherished self-care moment.
Step-by-Step Instructions manicure tool kit

Follow these precise steps for a flawless, chip-resistant manicure tool kit that lasts.
- Shape & File: File nails in one direction only, from the outer edge toward the center, using a gentle sawing motion. Choose your desired shape—square, almond, oval—and file accordingly.
- Buff the Surface: Lightly run the buffer block over the nail surface to remove ridges and create a smooth, matte finish. Wipe away dust with your brush.
- Cuticle Care: Apply cuticle softener. After soaking, gently push back cuticles with a cuticle pusher. ProTip: Never cut live cuticle tissue; only trim loose, dead skin with nippers if absolutely necessary.
- Degrease: Lightly wipe each nail with a cotton pad soaked in acetone or alcohol. This removes any residual oils, ensuring your base coat adheres perfectly and prevents premature chipping.
- Apply Base Coat: Swipe a thin layer of base coat, sealing the tip of the nail. Let it dry completely (2-3 minutes).
- Color Application: Apply your first thin color coat, starting just below the cuticle and sweeping to the tip. Don’t overload the brush. Let it dry (3-5 mins). Apply a second coat for opacity.
- Seal with Top Coat: Apply a generous, sealing top coat, making sure to run the brush over the tip to prevent chips. Let it cure fully.
- Final Touch: For a super-shiny finish, use a quick-dry spray or drops. Finish with cuticle oil.
Mastering this technique with the right tools from a comprehensive manicure tool kit is the key to consistent, salon-quality results.
Beauty Benefits / Advantages ; manicure tool kit
Regular at-home manicure tool kit offer profound benefits beyond aesthetics. Well-groomed nails are a universal sign of self-respect and attention to detail. The process itself is therapeutic, improving circulation through hand massage and reducing stress. A polished, professional look directly boosts confidence in personal and professional interactions.
Using a proper manicure set protects your nail health. Correct filing prevents peeling and splitting. Gentle cuticle care prevents infections and hangnails. The hydration step is crucial for combating dryness, especially in winter, keeping your hands looking youthful. Furthermore, you have complete control over the ingredients in your polishes and treatments, allowing you to choose formulas that are non-toxic, vegan, or tailored to weak, brittle nails.
Personal Care Advice
Adapt your routine to your lifestyle and environment. For a quick fix, focus on shaping, buffing, and a single coat of strengthening polish. For a full glam look, allocate more time for intricate art or gel applications.
Seasonal Adjustments: In dry winter months, increase the frequency of cuticle oil and hand cream application. Use richer, more emollient products. During humid summers, ensure nails are completely dry before applying polish to avoid bubbles, and opt for quick-dry formulas.
For Sensitive Nails: If your nails are prone to staining from dark polishes, always use a high-quality, pigmented base coat. Give your nails a “break” week every month with just a strengthening treatment and clear top coat.
Integrate mini-manicure tool kit moments into your week: a five-minute touch-up with a buffer to restore shine and a quick oil massage before bed can maintain results between full sessions.
Common Mistakes to Avoid; manicure tool kit
- Over-Filing or Filing Back and Forth: This weakens the nail plate, causing splits and layers. Always file in one direction.
- Skipping the De-greasing Step: Oils from your skin will lift polish, leading to immediate chips. Never skip the acetone wipe-down.
- Applying Thick Coats: This is the #1 cause of bubbling, smudging, and prolonged drying times. Thin, even coats are always better.
- Using Dull or Dirty Tools: Rusty clippers and filed-down buffers won’t work efficiently and can harbor bacteria. Sanitize and replace tools regularly.
- Rushing the Dry Time: Applying a second coat or using your hands too soon is a disaster. Patience is a non-negotiable part of the process.
The Fix: Invest in a good manicure set with quality materials. Set a timer for drying between coats. Clean tools with alcohol after every use.
Product Care & Maintenance Tips ; manicure tool kit
Your manicure tool kit are an investment. Proper care ensures they last for years and remain hygienic.
- Metal Tools (Clippers, Pushers, Nipper): Wash with soap and water after each use. Disinfect by soaking in isopropyl alcohol for 10 minutes. Dry thoroughly before storing to prevent rust.
- Files & Buffers: These are disposable. Replace them every few uses as they become clogged with debris and lose their abrasive surface.
- Nail Polish: Store bottles in a cool, dark place (not the bathroom!) away from direct sunlight and heat. Tighten caps securely. Thin out old, gloopy polish with a dedicated nail polish thinner, not acetone.
- Cuticle Oils/Creams: Check expiration dates. Natural oils can go rancid. Store in a cool, dry place.
- Your manicure tool kit Case: Wipe the interior regularly. Keep it organized so tools don’t rattle against each other, causing nicks and damage.
Conclusion
Mastering the at-home manicure tool kit is a powerful act of self-care that saves time and money while delivering beautiful, healthy results. The secret weapon is a well-chosen, high-quality manicure tool kit that provides the precision and durability needed for a flawless finish. By following the structured steps—from proper prep and careful application to diligent maintenance—you transform a simple beauty task into a ritual of confidence and relaxation. Embrace the process, avoid the common pitfalls, and enjoy the tangible rewards of perfectly groomed nails every single week. Your hands are your greatest accessories; treat them with the professional care they deserve.
Ready to build your perfect setup? Explore our guides on nail health and share your stunning manicure results in the comments below!
FAQs
1. How often should I do a full manicure at home?
For most people, a full manicure tool kit (including cuticle work) every 7-10 days is ideal to maintain nail health and appearance. Between full sessions, you can do quick touch-ups with a buffer and cuticle oil.
2. Can I use the same manicure tool kit set on my toenails?
Yes, but for hygiene, it’s best to have separate nail clippers and files for fingers and toes. Toenail clippers are typically larger and stronger. Always sanitize metal tools thoroughly between uses on different body parts.
3. My polish always chips on the second day. What am I doing wrong? This is usually due to insufficient sealing of the tip or applying thick coats. Ensure your top coat covers the very edge of the nail (the “free edge”). Use thin layers and let each coat dry completely. A proper base and top coat are essential.
4. Is it safe to push back my cuticles at home? Yes, if done gently after proper softening (soaking or with cuticle remover). Push back only the dead, excess cuticle skin. Never force or cut live cuticles, as this creates an open wound and risk of infection. If your cuticles are very overgrown, see a professional.
5. How do I choose between a glass nail file and an emery board? Glass or crystal files are gentler, create a smoother edge that is less likely to split, and can be sanitized. Emery boards are disposable and less expensive but can be more abrasive. For natural nails, a fine-grit glass file is the professional preference.